This is default featured slide 1 title
Go to Blogger edit html and find these sentences.Now replace these sentences with your own descriptions.
This is default featured slide 2 title
Go to Blogger edit html and find these sentences.Now replace these sentences with your own descriptions.
This is default featured slide 3 title
Go to Blogger edit html and find these sentences.Now replace these sentences with your own descriptions.
This is default featured slide 4 title
Go to Blogger edit html and find these sentences.Now replace these sentences with your own descriptions.
This is default featured slide 5 title
Go to Blogger edit html and find these sentences.Now replace these sentences with your own descriptions.
Sabtu, 14 Juni 2014
Tutorial vb6
13.47
No comments
BUAT SENDIRI SOFTWARE PENERIMAAN SISWA BARU
(BELAJAR VB 6)
Posting kali ini kita akan membuat aplikasi program penerimaan siswa baru (PSB) dengan dilengkapi fitur foto siswa.
Untuk lebih jelasnya silahkan sobat simak tutorial berikut :
Step 1 : buatlah database menggunakan ms. Office Access seperti contoh berikut :

Step 2 : Jalankan VB6 sobat dan pada project baru pilihlah VB Enterprise Edition Control.

dan lanjutkan dengan membuat desain seperti gambar berikut :

Oh…ya….. tambah juga dua buah komponen lagi, yakni ADODC dan CommonDialog.

Step 3 : Buatlah module koneksi dengan cara klik Project – Add Module

Pada kotak dialog Module tuliskan code berikut :

Step 4 : klik 2x pada Form dan tuliskan code berikut diantara Private Sub Form_Load() dan End Sub, code ini berfungsi untuk memanggil fungsi module :
dan lanjutkan dengan dengan menuliskan code berikut tepat dibawah code koneksi yang berfungsi untuk mengaktifkan ComboBox Kelamin dan ComboBox Agama :

Step 5 : Buatlah sebuah code untuk membersihkan form dan mengembalikan kondisi form dalam keaadaan awal. Caranya klik 2x form dan letakkan code berikut ini di tempat kosong pada form. Code ini saya beri nama "kosongkanform".

Step 6. Untuk mencari dan menampilkan foto masukkan code berikut dengan cara klik 2x tombol “Cari Foto” dan masukkan code diantara Private Sub cmdCari_Click() dan End Sub.

Step 7. Klik 2x txtNama.text, kemudian pada pilihlah mode “KeyPress”

Dan lanjutkan dengan menuliskan code berikut :
Step 8. Klik 2x tombol Simpan (cmdSimpan) dan tuliskan code berikut :

Step 9. Klik 2x tombol Edit (cmdEdit) dan tuliskan code berikut :

Step 10. Klik 2x tombol Hapus (cmdHapus) dan tuliskan code berikut :

Step Terakhir. Klik 2x tombol Tutup (cmdTutup) dan masukkan code berikut :

Yup….. aplikasi sudah selesai.
Buat sobat yang ingin download source codenya silahkan klik disini….
Posting kali ini kita akan membuat aplikasi program penerimaan siswa baru (PSB) dengan dilengkapi fitur foto siswa.
Untuk lebih jelasnya silahkan sobat simak tutorial berikut :
Step 1 : buatlah database menggunakan ms. Office Access seperti contoh berikut :

Step 2 : Jalankan VB6 sobat dan pada project baru pilihlah VB Enterprise Edition Control.

dan lanjutkan dengan membuat desain seperti gambar berikut :

Oh…ya….. tambah juga dua buah komponen lagi, yakni ADODC dan CommonDialog.

Step 3 : Buatlah module koneksi dengan cara klik Project – Add Module

Pada kotak dialog Module tuliskan code berikut :
Global conn As ADODB.Connection
Global rspsb As ADODB.Recordset
Sub koneksi()
On Error GoTo gagal:
Set conn = New ADODB.Connection
conn.Provider = "microsoft.jet.oledb.4.0"
conn.CursorLocation = adUseClient
conn.Open App.Path & "\DbPSB.mdb"
Exit Sub
gagal:
If (Err.Number = -2147467259) Then
MsgBox "Koneksi Aplikasi Ke Database Gagal...!", vbCritical, "Informasi"
End
End If
End Sub

Step 4 : klik 2x pada Form dan tuliskan code berikut diantara Private Sub Form_Load() dan End Sub, code ini berfungsi untuk memanggil fungsi module :
koneksi
cmbKelamin.AddItem "Laki-Laki"
cmbKelamin.AddItem "Perempuan"
cmbAgama.AddItem "Islam"
cmbAgama.AddItem "Kr. Protestan"
cmbAgama.AddItem "Kr. Katolik"
cmbAgama.AddItem "Hindu"
cmbAgama.AddItem "Budha"
cmbKelamin.AddItem "Perempuan"
cmbAgama.AddItem "Islam"
cmbAgama.AddItem "Kr. Protestan"
cmbAgama.AddItem "Kr. Katolik"
cmbAgama.AddItem "Hindu"
cmbAgama.AddItem "Budha"

Step 5 : Buatlah sebuah code untuk membersihkan form dan mengembalikan kondisi form dalam keaadaan awal. Caranya klik 2x form dan letakkan code berikut ini di tempat kosong pada form. Code ini saya beri nama "kosongkanform".
Private Sub kosongkanform()
txtNama.Text = ""
txtNis.Text = ""
cmbKelamin.Text = ""
txtTmp.Text = ""
cmbAgama.Text = ""
txtStatus.Text = ""
txtAnak.Text = ""
txtSaudara.Text = ""
txtSasal.Text = ""
txtNama.Enabled = True
cmdSimpan.Enabled = True
cmdEdit.Enabled = False
cmdHapus.Enabled = False
cmdCari.Enabled = False
End Sub
txtNama.Text = ""
txtNis.Text = ""
cmbKelamin.Text = ""
txtTmp.Text = ""
cmbAgama.Text = ""
txtStatus.Text = ""
txtAnak.Text = ""
txtSaudara.Text = ""
txtSasal.Text = ""
txtNama.Enabled = True
cmdSimpan.Enabled = True
cmdEdit.Enabled = False
cmdHapus.Enabled = False
cmdCari.Enabled = False
End Sub

Step 6. Untuk mencari dan menampilkan foto masukkan code berikut dengan cara klik 2x tombol “Cari Foto” dan masukkan code diantara Private Sub cmdCari_Click() dan End Sub.
CommonDialog1.Filter = "Picture files (*.jpg;*.bmp;*.gif;*.png)|*.jpg;*.bmp;*.gif;*.png"
CommonDialog1.ShowOpen
Image1.Picture = LoadPicture(CommonDialog1.FileName)
Image1.Visible = True
CommonDialog1.ShowOpen
Image1.Picture = LoadPicture(CommonDialog1.FileName)
Image1.Visible = True

Step 7. Klik 2x txtNama.text, kemudian pada pilihlah mode “KeyPress”

Dan lanjutkan dengan menuliskan code berikut :
Private Sub txtNama_KeyPress(KeyAscii As Integer)
If KeyAscii = 13 Then
Set rspsb = New ADODB.Recordset
rspsb.LockType = adLockOptimistic
rspsb.CursorType = adOpenDynamic
rspsb.Open "select * from nis", conn, , , adCmdText
rspsb.Filter = " Nama= '" & txtNama.Text & "'"
If Not rssiswa.EOF Then
cmdSimpan.Enabled = False
cmdEdit.Enabled = True
cmdHapus.Enabled = True
Image1.Visible = True
txtNama.Enabled = False
txtNis.Text = rspsb.Fields(1)
cmbKelamin.Text = rspsb.Fields(2)
txtTmp.Text = rspsb.Fields(3)
DTPicker1.Value = rspsb.Fields(4)
cmbAgama.Text = rspsb.Fields(5)
txtStatus.Text = rspsb.Fields(6)
txtAnak.Text = rspsb.Fields(7)
txtSaudara.Text = rspsb.Fields(8)
txtSasal.Text = rspsb.Fields(9)
CommonDialog1.FileName = rspsb.Fields(10)
Image1.Picture = LoadPicture(CommonDialog1.FileName)
If CommonDialog1.FileName = "" Then
Else
End If
End If
End If
End Sub
Step 8. Klik 2x tombol Simpan (cmdSimpan) dan tuliskan code berikut :
Dim X
If txtNama.Text = "" Or txtNis.Text = "" Or cmbKelamin.Text = "" Or _
txtTmp.Text = "" Or DTPicker1.Value = "" Or cmbAgama.Text = "" Or _
txtStatus.Text = "" Or txtAnak.Text = "" Or txtSasal.Text = "" Then
MsgBox "Data Belum Lengkap", vbInformation, "Pesan"
Exit Sub
Else
X = MsgBox("Apakah Data Ingin Disimpan...?", vbQuestion + vbYesNo)
If X = vbYes Then
Set rspsb = New ADODB.Recordset
rspsb.LockType = adLockOptimistic
rspsb.CursorType = adOpenDynamic
rspsb.Open "SELECT * FROM siswa", conn, , , adCmdText
rspsb.AddNew
rspsb.Fields(0) = txtNama.Text
rspsb.Fields(1) = txtNis.Text
rspsb.Fields(2) = cmbKelamin.Text
rspsb.Fields(3) = txtTmp.Text
rspsb.Fields(4) = DTPicker1.Value
rspsb.Fields(5) = cmbAgama.Text
rspsb.Fields(6) = txtStatus.Text
rspsb.Fields(7) = txtAnak.Text
rspsb.Fields(8) = txtSaudara.Text
rspsb.Fields(9) = txtSasal.Text
rspsb.Fields(10) = CommonDialog1.FileName
rspsb.Update
MsgBox "Data Tersimpan...!", vbInformation, "Pesan"
kosongkanform
Image1.Visible = False
Else
Exit Sub
End If
End If

Step 9. Klik 2x tombol Edit (cmdEdit) dan tuliskan code berikut :
Dim a
a = MsgBox("Edit Data...?", vbQuestion + vbYesNo, "Pesan")
If a = vbYes Then
rspsb.Fields(1) = txtNis.Text
rspsb.Fields(2) = cmbKelamin.Text
rspsb.Fields(3) = txtTmp.Text
rspsb.Fields(4) = DTPicker1.Value
rspsb.Fields(5) = cmbAgama.Text
rspsb.Fields(6) = txtStatus.Text
rspsb.Fields(7) = txtAnak.Text
rspsb.Fields(8) = txtSaudara.Text
rspsb.Fields(9) = txtSasal.Text
rspsb.Fields(10) = CommonDialog1.FileName
rspsb.Update
MsgBox "Data Berhasil Di Edit..!!", vbInformation, "Info"
kosongkanform
txtNama.SetFocus
Image1.Visible = False
Else
Exit Sub
End If
Step 8. Klik 2x tombol Hapus (cmdHapus) dan tuliskan code berikut :
Dim Y
Y = MsgBox("Apakah Data Ingin Dihapus..?", vbQuestion + vbYesNo)
If Y = vbYes Then
rspsb.Delete
MsgBox "Data Berhasil Dihapus..!!", vbInformation, "info"
kosongkanform
txtNama.SetFocus
Else
Exit Sub
End If

Step 10. Klik 2x tombol Hapus (cmdHapus) dan tuliskan code berikut :
Dim Y
Y = MsgBox("Apakah Data Ingin Dihapus..?", vbQuestion + vbYesNo)
If Y = vbYes Then
rspsb.Delete
MsgBox "Data Berhasil Dihapus..!!", vbInformation, "info"
kosongkanform
txtNama.SetFocus
Else
Exit Sub
End If
Y = MsgBox("Apakah Data Ingin Dihapus..?", vbQuestion + vbYesNo)
If Y = vbYes Then
rspsb.Delete
MsgBox "Data Berhasil Dihapus..!!", vbInformation, "info"
kosongkanform
txtNama.SetFocus
Else
Exit Sub
End If

Step Terakhir. Klik 2x tombol Tutup (cmdTutup) dan masukkan code berikut :
Dim X
X = MsgBox("Apakah Anda Ingin Keluar..?", vbQuestion + vbYesNo, App.Title)
If X = vbYes Then
Unload Me
Else
Cancel = 1
End If
X = MsgBox("Apakah Anda Ingin Keluar..?", vbQuestion + vbYesNo, App.Title)
If X = vbYes Then
Unload Me
Else
Cancel = 1
End If

Yup….. aplikasi sudah selesai.
Buat sobat yang ingin download source codenya silahkan klik disini….
Kamis, 12 Juni 2014
TUTOR VB SIMULASI LAMPU JALAN
22.26
1 comment
MEMBUAT PROGRAM SIMULASI
LAMPU LALU LINTAS
DENGAN VISUAL BASIC
1. Langkah pertama buka program Visual Basic
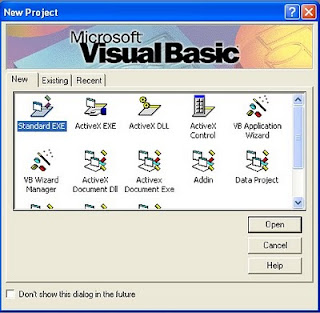
2. Pilih standar.exe untuk New Project kemudian Klik Open
2. Pilih standar.exe untuk New Project kemudian Klik Open
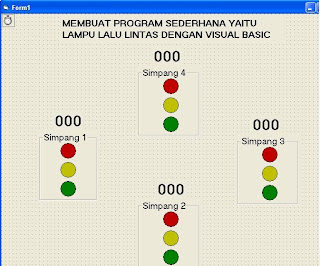
3. Tambahkan 5 Label 1 label untuk judul dan
=>4 label untuk waktu masing-masing simpang,
=>4 frame untuk masing-masing simpang dan
=>12 shape dimana atur properti fillstyle
mendaji solid dan
=>fillcolor pilih warna yang sesuai serta satu
buah timer dan desainlah menjadi seperti
gambar dibawah ini :
=>4 label untuk waktu masing-masing simpang,
=>4 frame untuk masing-masing simpang dan
=>12 shape dimana atur properti fillstyle
mendaji solid dan
=>fillcolor pilih warna yang sesuai serta satu
buah timer dan desainlah menjadi seperti
gambar dibawah ini :
4. Ubah Properti Interval pada control Timer
dengan memasang nilai 1000 dan dalam keadaan
false.
5. Masukkan kode program seperti dibawah ini :
Private Sub tunda()
a = Timer
Do While Timer < 1 + a
DoEvents
Loop
End Sub
Private Sub Form_Load()
Timer1.Enabled = True
End Sub
Private Sub Timer1_Timer()
For i = 0 To 10
Label1(0).Caption = 11 - i
Label1(1).Caption = 21 - i
Label1(2).Caption = 31 - i
Label1(3).Caption = 41 - i
If i = 0 Then
Shape10.FillColor = &HC0C0&
Shape1.FillColor = &HC0&
Shape2.FillColor = vbYellow
Shape5.FillColor = vbRed
Shape8.FillColor = vbRed
Shape11.FillColor = vbRed
Else
Shape12.FillColor = &H8000&
Shape2.FillColor = &HC0C0&
Shape3.FillColor = vbGreen
End If
tunda
Next i
For i = 10 To 20
Label1(0).Caption = 51 - i
Label1(1).Caption = 21 - i
Label1(2).Caption = 31 - i
Label1(3).Caption = 41 - i
If i = 10 Then
Shape5.FillColor = &HC0&
Shape3.FillColor = &H8000&
Shape2.FillColor = vbYellow
Shape4.FillColor = vbYellow
Else
Shape2.FillColor = &HC0C0&
Shape4.FillColor = &HC0C0&
Shape1.FillColor = vbRed
Shape5.FillColor = &HC0&
Shape6.FillColor = vbGreen
End If
tunda
Next i
For i = 20 To 30
Label1(0).Caption = 51 - i
Label1(1).Caption = 61 - i
Label1(2).Caption = 31 - i
Label1(3).Caption = 41 - i
If i = 20 Then
Shape8.FillColor = &HC0&
Shape6.FillColor = &H8000&
Shape4.FillColor = vbYellow
Shape7.FillColor = vbYellow
Else
Shape4.FillColor = &HC0C0&
Shape7.FillColor = &HC0C0&
Shape5.FillColor = vbRed
Shape8.FillColor = &HC0&
Shape9.FillColor = vbGreen
End If
tunda
Next i
For i = 30 To 40
Label1(0).Caption = 51 - i
Label1(1).Caption = 61 - i
Label1(2).Caption = 71 - i
Label1(3).Caption = 41 - i
If i = 30 Then
Shape11.FillColor = &HC0&
Shape9.FillColor = &H8000&
Shape7.FillColor = vbYellow
Shape10.FillColor = vbYellow
ElseIf i = 40 Then
Shape2.FillColor = vbYellow
Shape10.FillColor = vbYellow
Shape12.FillColor = &H8000&
Shape1.FillColor = &HC0&
Else
Shape7.FillColor = &HC0C0&
Shape10.FillColor = &HC0C0&
Shape8.FillColor = vbRed
Shape11.FillColor = &HC0&
Shape12.FillColor = vbGreen
End If
tunda
Next i
End Sub
6. Jalankan Program dan Untuk
melihat contohnya bisa anda BUKA
url youtube dibawah :
http://www.youtube.com/watch?feature=player_embedded&v=hBwEjpCcuuk


.jpg)
